Your Wifi Max should look like this:
Or Wifi Link, like this:
Preparation:
Step 1.DO NOT PLUG IN THE WIFI MAX!!!!!!
Step 2. That CD you got with your wifi max throw it out the window right now GO!!!! (Neither adapter will work with Kai if you use the drivers that come from the CD).
Step 3. FOLLOWING THIS GUIDE WILL GET YOUR WIFI MAX/WIFI LINK WORKING.
Step 4. Download the ZyDAS Utility for XP http://xlink.sgtlegend.com/PSP/Zydas/ZD1211B_XP.exe or http://xlink.sgtlegend.com/PSP/Zydas/ZD1211_XP.exe
Installation Step 5. Now the setup window opens.
Step 6. Click Next.
Step 7. Click Next Again
Step 8. Click Finish when the install is done.
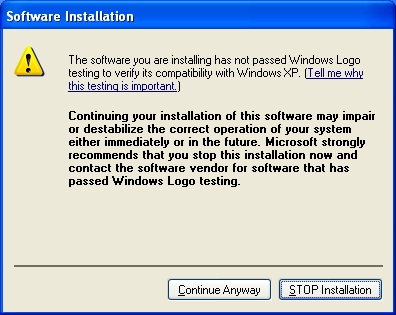
Step 9. A software installation window will pop up saying you are installing software that has not passed windows logo testing blah blah blah. Click Continue Anyway.
Step 10. Now plug in your wifi max Here you should see a pop up balloon that says Installing Devices and it should say (ZD1211B)IEEE 802.11 b+g USB Adapter.
Step 11. Now this window should appear.
Step 12. Click Install from a list or specific location (Advanced) Option Then Click next
Step 13.Now you will arrive at this screen.
Step 14. Choose the Dont Search I will choose the driver to install option. Click Next
Step 15. You will see this screen.
IF YOUR SCREEN MATCHES THE IMAGE ABOVE SKIP TO STEP 30. IF YOUR SCREEN DOES NOT MATCH THE IMAGE ABOVE PLEASE PROCEED TO STEP 16
Step 16. Click Have Disk
Step 17. This window will appear.
Step 18. Click Browse button
Step 19. The locate file window will appear.
Step 20. Now down where it says file name at the bottom. Type c:\program files\zydas technology corporation Then hit Enter.
Step 21. Now you will arrive at this location.
Step 22. Double click on the ZyDAS_802.11g_Utility folder
Step 23. You will now see this.
Step 24. Double click on the InsDrvTemp_USB folder.
Step 25. You will now see this.
Step 26. Now click on the ZD1211BU file then click open
Step 27. You will now arrive back at this screen.
Step 28. Click Ok
Step 29. Now you will arrive back here.
Step 30. Now Click Next.
Step 31. The driver will start installing and this lovely window will pop up again.
Step 32. Click continue anyways.
Step 33. Once the driver finishes installing you should arrive at this screen.
Step 34. Click Finish
Step 35. Now the Zydas Program should appear down in your task bar
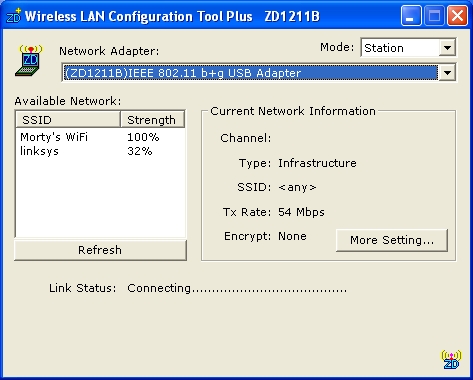
Step 36. Now Click Start All Programs ZyDAS IEEE 802.11 b+g Wireless LAN-USB ZDWLan Utility
Step 37. This window will appear.
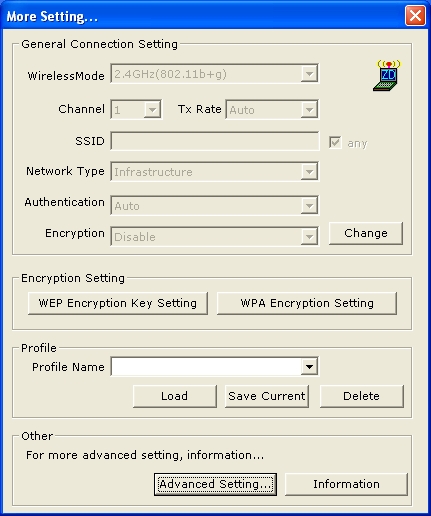
Step 38. Now Click More Setting
Step 39. This window will come up.
Step 40. Now down at the bottom Click Advance Setting.
Step 41. This window will appear.
Step 42. Put a check mark in the PSP XLink Mode box.
Step 43. Your screen should look like this.
Step 44. Now Close that window.
Step 45. You will be back at this screen.
Step 46. Now click the Change button
Step 47. The options will come available to change.
Step 48. Now make the following changes Channel -1 Tx Rate- AUTO Uncheck the box that says ANY Network Type- AD HOC Aunthentication- AUTO Encryption- Disable WEP
Step 49. Your screen should look like this.
Step 50. Click the Apply button and the settings will gray out again. Now close that window
Step 51. Now turn on your psp and make sure you set the network settings to ad hoc channel 1. Then launch your game For this guide i will be using monster hunter freedom 2.
Step 52. Load the game goto online Guide hall
Step 53. Now click the refresh button in the ZDWLan utility till you see your PSP.
Step 54. Now double click on your psp when it appears ( NOTE* You will not see Morty's Wifi on your screen.)
Step 55. Now make sure you are using this version of XLink Kai http://www.teamxlink.co.uk/binary/XLinkKai-7.4.18-win32.msi
Step 56. After you install XLink Kai. Click Start goto All Programs XLink Kai Start XLink
Step 57. Now login to XLink then close XLink
Step 58. Now click Start again Goto All Programs XLink Kai Configure Kai
Step 59. Now you should see this screen.
Step 60. Now under Network Adapter Click it and change it to (ZD1211B)IEEE 802.11 b+g USB Adapter
Step 61. Next Make sure you put a check mark in the Follow PSP SSID check box.
Step 62. Yours should look like this.
Step 63. Click the Save button
Step 64. Now Click Start All Programs XLink Kai Start Kai
Step 65. Login
Step 66. Now one your logged into XLink Click the Game arenas button at the top
Step 67. You will arrive here.
Step 68. Now Click the metrics button Scroll down to the bottom AND VOILA your PSP SHOULD BE DETECTED.
Now you can go play your PSP on XLink Kai. Have Fun!


