Hawk_The_Slayer
Team XLink Administrator


Joined: 02 Jul 2006
Posts: 1030

|
 Posted:
Mon Jul 05, 2010 9:02 am Posted:
Mon Jul 05, 2010 9:02 am |
  |
AdhocToUSB CFW PSP Plug-in and Xlink Kai with Windows 7 32/64-bit.
This guide was written on my girlfriends Windows 7 32-bit laptop, using a PSP Slim 2000 with 5.50 GEN-D3 and was a totally clean install to show the enitre set-up process, errors and all! Using a driver link below (section 19), this guide can also be applied to Windows 7 64-bit.
(Check out the fantastic Windows Experience rating!)

===============================================
What you will need:
1) A PSP with a compatible custom firmware (CFW) Google to find the downloads attached to YOUR PSP's CFW:
For users with: 6.60 ME-1/1.2/1.3/1.4/1.5/1.6/1.7/1.8, PRO-B9/B10 & GOD-A:
For users with: 6.35 PRO-B2 to B10, Neur0n's 6.35 CFW beta v17 Fix2, 6.35 GOD-A, 6.37 ME-6 Fix2/7/7Fix/8, 6.38 ME-1/2/3 & 6.39 ME/PRO/GOD:
For users with: 6.20 TN-D, 6.20 PRO B2/B4/B5/B6/B7/B8/B9(NIGHTLY) B10 & 6.20 GOD-A:
**NB** 6.20 TN-E Fix DOES NOT SEEM TO BE COMPATIBLE and,
For users with: 5.03 GEN-C, 5.03 CFW Enabler 3.7, 5.50 GEN-B, 5.50 GEN-D2/D3, 5.50 GEN-D3 Prometheus (Versions 1 - 4)
2) A PSP to P/C USB cable.
--------------------------------------------------------------------------------------
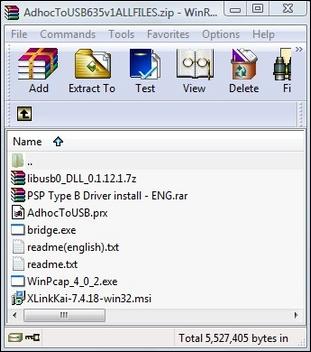
If you are using a 5.xx CFW, you should now have the following five files:

If you are using a 6.xx CFW, you should now have the following eight files:

===============================================
I Install WinPcap:
1) Double-click to run the WinPcap installer:

2) Next, agree to the terms and end the install with finish.

===============================================
II Install Xlink Kai 7.4.18:

3) Double-click to run the Kai installer, agree to the terms and hit finish to complete the install.


===============================================
III Configuring Kai.
4) On your pc, select Start, All Programs Xlink Kai and then Configure Kai:

**NOTE** You may get an error message (as I did) saying Unable to initilize PSSDK library:

If this happens, try the following:
a) Goto Start, All Programs. Xlink Kai and then RIGHT CLICK on Configure Kai, select Properties then the Compatibilty tab.
b) Select the Run this program in compatibilty mode for: Windows Vista (Service Pack 1) then check the Run this program as an administrator box under Privilege Level, hit Apply, then Save:

5) Back to your pc, again, select Start, All Programs, Xlink Kai and then Configure Kai.
Your browser should now attempt to open to the Kai Configuration screen:

6) Enable Intranet Settings to clear the warning message and hit Yes when prompted to:

7) Complete the fields with your personal XTag and password and check the boxes as shown and finally hit Save.

The browser will try to close but also, right-click on the Kai Engine in the bottom-right of your task bar and then Exit:

===============================================
IV Installing the Microsoft Loopback Adapter:
8) Next, install the Microsoft Loopback Adapter by clicking the Start icon, typing Run into the Search box, then Enter then type hdwwiz and finally OK.

9) Hit next then select the option Install the hardware that I manually select from a list (Advanced) then next again:


10) Select Network adapters then next,

11) Select Microsoft from the Manufacturer list on the left, then scroll down and select Microsoft Loopback Adapter from the list on the right.

12) Hit next to start the install, then hit finish:

13) Now head back to Configure Kai and select Microsoft Loopback Adapter from the drop-down menu under the heading Network Adapter hit Save once again and exit out from Kai as before:
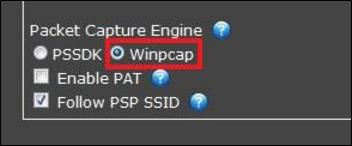
UPDATE: Some users have found to get their bridge working, they need to check the 'Winpcap' option in the Kai Configuration options. Try it if you experience problems:

14) Enabling Internet Connection Sharing (ICS)
Depending on your home network set-up, you may need to enable ICS for your Loopback Adapter. This is done as follows:
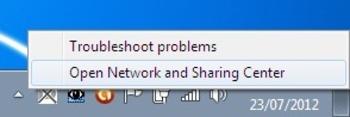
15) Right click on the icon on your taskbar that represents your internet connection (in my case as it's a wireless internet connection, Windows 7 shows it as series of bars between the battery/power icon and the volume icon) and select the Open Network and Sharing Center option:

16) Then click the Change Adapter Settings (on the upper left):

17) Then Right click on your internet connection (in my case it's the one labelled Wireless Network Connection) and select Properties:

18) Now click on the Sharing tab:

19) Finally, check the Allow other network users to connect through this computer's Internet connection and select the name given to the Loopback Adapter connection, in my case, it's Local Area Connection 2 and hit OK:

You can check your internet connection is now shared by repeating step 15:

===============================================
V Installing the plug-in to your PSP.
20) Connect your PSP to your pc with the USB cable.
21) Put AdhocToUSB.prx in ms0:/seplugins/ (0 being the drive letter of your PSP):
For PSPGo users put AdhocToUSB.prx in ef0:/seplugins/(0 being the drive letter of your PSPGo):

22) Also, add ms0:/seplugins/AdhocToUSB.prx 1 to ms0:/seplugins/game.txt
Important !!! If you are a PSPGo user add ef0:/seplugins/AdhocToUsb.prx 1 to ef0:/seplugins/game.txt

*NOTE* If it's missing, create the file and hit save. Reboot your PSP and enable the plug-in via the PSP 'Recovery Menu'.
**IMPORTANT** PLEASE DISABLE ALL OTHER PLUG-INS THAT REQUIRES THE USB CABLE TO BE CONNECTED.
===============================================
VI Installing PSP Type B driver.
23) If not already done so, run the PSP Type B installer:

24) Accept the EULA and hit next. You'll get a Windows can't verify the publisher of this driver software message to which you should click Install this driver software anyway.

25) Click finish to complete the install then reboot your pc. That's everything you need to install now done :)

--------------------------------------------------------------------------------------
FOR 64-BIT WIN 7 USERS:
Check out the guides by Zedd56 and CaptainFlameGuy contained in this next link:
http://www.teamxlink.co.uk/forum/viewtopic.php?t=41816
===============================================
VII Using Kai and the plug-in:
26) Once rebooted, goto start then Start Kai:

**NOTE** If after entering General Chat you get a Kai pop-up balloon saying Your network is unreachable, please check port forwarding read here: http://teamxlink.co.uk/wiki/doku.php?id=evo7:port_forwarding
If after you've set-up your port forwarding and it still doesn't work, try UNchecking the Enable PAT box in your Kai configuration as shown:

27) Start the adhoc game you are playing, in this case Monster Hunter Freedom Unite (MHFU) and enter the online Gathering Hall 01.
28) From the AdhocToUSB.zip file, drag and drop the bridge.exe(or just Bridge for the purposes of this guide) to your desktop and double-click to run it:


**NOTE** If after you try to run the bridge you get an error message about a missing LibUSB0.dll, simply extract it from the .rar file (you should have already downloaded it) and drag and drop it onto the bridge icon
29) Then select WHATEVER NUMBER THAT CORRESPONDS TO THE MS LOOPBACK ADAPTER, in my case, I select number 3 and press enter:

30) Next, connect your PSP to your pc with the USB cable and the bridge should now find your PSP.

*Note* It may show errors but this shouldn't necessarily cause you a problem. Just try restarting the bridge to clear them:

31) In Xlink Kai, click the Metrics tab and check it looks like this:


32) Finally, head to the arena of the game you are wanting to play and hope you now start to see users appearing in the lobby and/or on your PSP :)


===============================================
Oh and before anyone asks, NO this won't work on a non custom firmware PSP. Also, there are problems with some games so far, Final Fantasy Dissidia being one of them but YES, Monster Hunter has been confirmed to work by many users! It maybe a case of 'the better your ping, the better the plug-in will work' but as it's still early days, we are yet to fully know why some games don't seem to be compatible.
And lastly, please don't get any ideas about using your CFW PSP to cheat here at Xlink. Moderators regularly play too and can and will permanently ban users using Action Replay, Cheat savadata or any other cheating app, homebrew or plug-in in a NON CHEATING/MODS ARENA.
Thank you,
Team Xlink.
===============================================
For Adhoc to USB ongoing, compatible games list, read here:
http://www.teamxlink.co.uk/forum/viewtopic.php?t=39665
Credits:
Guide/screenshots written by Hawk_The_Slayer
Plug-in created by 'Yuki-Mi'.
Thanks to Narolf for resizing the images twice. |
_________________
Kai supported games: http://www.teamxlink.co.uk/?go=games |
|